Animal Hospital Beginner's Guide
Everything you need for your first ten shifts: the loop, the guaranteed patterns, a full sanity cheat-sheet, and the mistakes that kill most new players.
Free wins — fixed patterns
- Shift 1's first two patients are always safe: patient #1 goes to Room 1 and needs Herbs; patient #2 goes to Room 2 and needs Eyedrops. Free tutorial money.
- Unlock order: shutters + cameras after Shift 1 → shop + ER (Rooms 6–8) after Shift 2 → taser after Shift 3 → ambulance events from Shift 4 (then every 5 shifts).
- Economy: curing a patient = 2 Animal Coins; blocking an anomaly = 0.5; each visitor = 0.5. In-shift cash only works in the Supplies Shop.
- Knocked-out patients can be dumped in the trash to skip treatment — it doesn't count as a death. ("No one will know...")
Your first three shifts, one at a time
The opening shifts are a staged tutorial — the game hands you one mechanic at a time and unlocks the next tool at the end of each night. Knowing what arrives when means you can spend Shift 1 learning the treatment loop instead of bracing for something that cannot happen yet.
- 1Shift 1 — a scripted tutorial you cannot fail
Both patients are fixed and neither is ever an anomaly: the first goes to Room 1 with a stomach ache and needs Herbs, the second goes to Room 2 with dried eyes and needs Eyedrops. Use it to learn the actual loop — hand over a card, send them to the room, run the DNA analyzer, read the 1–3 required treatments off the bed screen, fetch the meds, then wait out the roughly 35-second recovery. Shutters and cameras unlock when the shift ends.
- 2Shift 2 — anomalies and story characters start arriving
This is where the job begins: real anomalies enter the queue, the Mass of Eyes can appear on room ceilings (a 'Don't look up' message announces it), and the Head Banger starts slamming the side window. Named NPCs turn up too — Barney from Shift 2, Ratthew around Shifts 2–4, Ron from Accounting in Shifts 2–3. The Emergency Wing (Rooms 6–8) and the shop unlock at the end.
- 3Shift 3 — the shop opens and the taser arrives
From here the Supplies Shop opens for 3 minutes at the start of each shift with 3 random items — this is where in-shift cash goes. The loop is otherwise unchanged, and the taser unlocks at the end of the night. Until you have it, an anomaly at the window is a shutter problem, not a combat problem.
- 4Shift 4 — the ambulance event, then it repeats every 5 shifts
The shift ends with six patients rushing in at once, any of which can be anomalies — the first time the game asks you to triage under pressure rather than one animal at a time. It comes back every 5 shifts, so Shift 4 is the rehearsal for a permanent feature.
Two limits apply from the beginning. Three animal deaths fail the run — Dr. Harlow spells this out on his last active visit at Shift 6 — and a wrong treatment kills the patient, so reading the bed screen properly matters more than reading it fast. The community rule of thumb is that solo play stays comfortable to about Shift 6; past that, bring a team. Full structure on the shift and ending page.
The check-in routine that catches all 19 anomalies
Every anomaly gives itself away through exactly one of three channels, and the split is lopsided: 8 of the 19 are visible in person, 3 only on the printed photo, and 8 more only on the CCTV. Skipping the CCTV check alone leaves 8 of the 19 uncaught, and skipping any one of the three leaves part of the list uncaught, so run all three in the same order on every patient until it is muscle memory.
- 1Look at the animal through the glass
Seven anomalies stop here and need no equipment. Check the face for extra or misplaced eyes, sharp teeth, eyes sitting visibly too high, or a grin that looks painted on rather than expressed — then check the stance. A patient idling hunched and slouched is an anomaly essentially every time.
- 2Take the polaroid — and let it finish printing
Three anomalies only exist on the photo. Compare ears first: they are the fastest feature to cross-reference, and 'bunny ears in person, bear ears in the print' is the textbook case. Look at the developed print before you physically grab it, because a cursed photo costs −10 sanity on pickup and a regular anomaly photo costs nothing.
- 3Open the CCTV before you clear anyone
Eight anomalies — the largest group — render only on camera, and the patient can look completely ordinary through the glass. Watch for a head rotating further than a neck allows, a face behind a black bar, a solid-black silhouette, or ears and eyes that disagree with the animal in front of you. Toggling the feed off and on is its own test: proportions that change every time are the Unnatural Body, not a rendering glitch.
- 4Then decide — shutter, weapon, or card
Anomaly: closing the shutter on a confirmed anomaly is the safe answer and costs nothing on your end-of-shift results, though it only pays 0.5 Animal Coins against 2 for a cure. Tasing a confirmed anomaly pays +2 sanity; tasing or shooting a normal animal costs −15, which is why the three checks come first. Real patient: hand over a card and send them to a room.
- 5Keep watching the room after treatment
Some anomalies aren't finished when the paperwork is. Staring and Twitching always turn into Mimics during recovery, and Hollow Face always triggers a Death Ritual — which is why shutting the window on it is simply the better play. Linger outside the room for a minute and listen: Mimics often mutter "I'm hungry..." or "I feel funny..." right before they turn.
One shortcut that saves whole shifts: if every patient looks handled but the night won't end and there's no "The doctor is coming" message, one of the remaining "patients" is an anomaly you cleared by mistake. Go back through the rooms on camera. Every individual tell is listed on the anomalies page, which also has an identifier tool: pick what you noticed, get the name and the correct play.
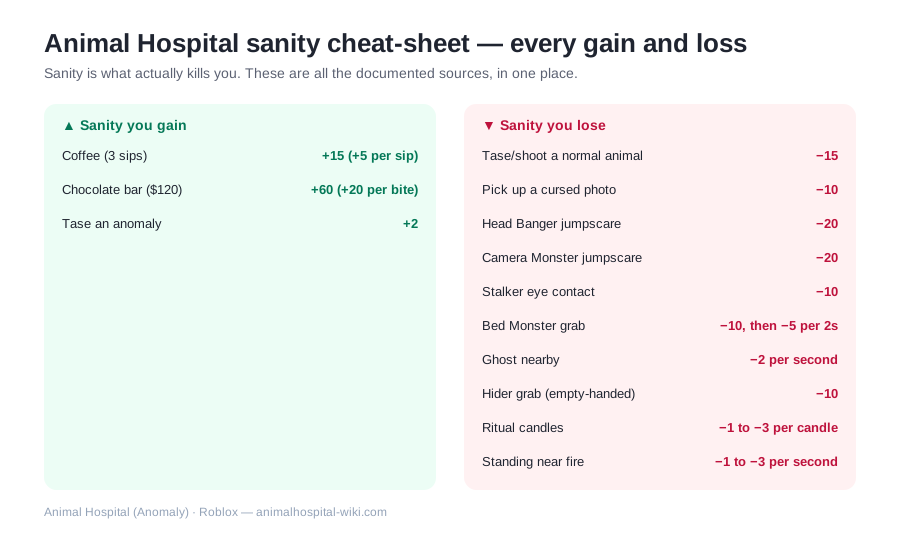
Sanity cheat-sheet
You start at 61% sanity by default (more with the right class). Hit zero and you die — a teammate can revive you with a $1,000 Teddy Bear, but you can't use one on yourself.
| Action / event | Sanity | Notes |
|---|---|---|
| Coffee (3 sips) | +15 (+5 per sip) | Machine brews one cup per 180s; can't be handed to teammates once taken |
| Chocolate bar ($120) | +60 (+20 per bite) | Best sanity-per-dollar in the shop |
| Tase an anomaly | +2 | Confirm it's an anomaly first |
| Tase/shoot a normal animal | −15 | The reason you double-check |
| Pick up a cursed photo | −10 | Let photos finish printing, look, then grab |
| Head Banger jumpscare | −20 | Happens if you shoo it without coffee |
| Camera Monster jumpscare | −20 | Zooming in on a broken feed |
| Stalker eye contact | −10 | Look at its legs, not its face |
| Bed Monster grab | −10, then −5 per 2s | Stay off the red floor |
| Ghost nearby | −2 per second | Spray with extinguisher to reveal |
| Hider grab (empty-handed) | −10 | It steals held items instead |
| Ritual candles | −1 to −3 per candle | Eyedrops/IV/coffee snuff them without loss |
| Standing near fire | −1 to −3 per second | Grab the extinguisher |
Shop upgrades worth knowing
| Upgrade | Price | Verdict |
|---|---|---|
| DNA analysis +50% speed | $110 | Stacks — a top priority buy |
| Backpack +1 slot | $100 | Always useful |
| Recovery +25% speed | $115 | Faster shift turnover |
| Computer +33% speed | $110 | Quality of life |
| Second check-in window | $190–200 | Process two patients at once (rooms permitting) |
| Instant check-in | $250 | Strong in late shifts |
| Taser (1 use / 5 uses) | $150 / $250 | Insurance against Mimics |
| Gun (20 rounds) | $410 | The heavy answer |
| Auto-stock medicine | $450 | Careful: delivers unneeded meds too — situational |
| Run Cola | $75 | Speed boost for events |
The Supplies Shop opens for 3 minutes at the start of each shift (from Shift 3) with 3 random items; exact unlock shifts for some items are still community-unconfirmed.
Animal Coins vs in-shift cash — and what your first 100 coins buy
The table above spends in-shift cash ($), which only works in the Supplies Shop and buys nothing outside it. Animal Coinsare the separate, persistent currency, and they buy exactly one thing that matters: classes. Mixing the two up is the most common reason a new player wonders why they still can't afford anything after five good shifts.
Coins come from three actions, and the rates decide how you should play:
| Action | Animal Coins | What that means for a beginner |
|---|---|---|
| Cure a patient | 2 | Four times what a rejection pays — accuracy, not caution, is the farming method |
| Block an anomaly | 0.5 | Safe and correct, but a shift of pure rejections earns very little |
| Each visitor handled | 0.5 | Passive income that adds up over a long shift |
At 2 coins a cure, that puts real numbers on the class shop (the yellow circle next to the ambulance in the lobby). Here is the bottom of the ladder — the only part a new player needs:
| Class | Cost | ≈ cures | What you get |
|---|---|---|---|
| 🎓 Intern | Free | — | +10 / +15 / +20 starting sanity by level — you begin at 71%, 76% or 81% instead of 61% |
| 🎒 Nurse | 20 coins | 10 | +1 / +2 / +3 backpack slots (4, 5 or 6 against the default 3) — fewer supply runs mid-shift |
| 📋 Secretary | 120 coins | 60 | 1 sanity back per patient checked in, $20 starter cash, and +5 / +10 starting sanity at levels 2–3 |
The honest recommendation is to skip the impulse buy. Nurse is affordable after ten cures, and more pockets is genuinely useful, but our tier list calls Secretary the correct first purchase — sanity that refills itself every time you do the front-desk job beats inventory space you still have to keep topping up. The free Intern is a perfectly good place to wait it out: at level 3 you start every shift at 81% sanity, which is exactly the margin for error a new player needs, and its bonus is the only thing you get for nothing. Two classes sit off this ladder entirely — Head Nurse and Secret Agent are Robux-only and no amount of curing unlocks them — and the game has no codes to shortcut the grind either.
The 7 classic new-player mistakes
- 1Punching a Mimic bare-handed
It costs a pile of sanity and barely works solo. Use the taser or gun, or gang up in a group.
- 2Shooing the Head Banger
That's an automatic −20. Give it coffee (sip twice first for a free +10) or just let it break the glass — the damage is cosmetic.
- 3Grabbing photos instantly
Cursed photos cost −10 on pickup. Wait for the print to develop, look, then decide.
- 4Treating slime as proof
Patients dropping slime are NOT necessarily anomalies. Static photos also stopped being a guaranteed Mimic tell after the June 22 update.
- 5Forgetting Room 8's rule
The first surgery treatment is always IV drops, and the Tentacle sequence bans tasers, guns and coffee — using them kills the patient instantly.
- 6Everyone drinking the coffee
Cups can't be shared after pickup and you can't see teammates' sanity bars — call out who needs it.
- 7Panicking when the shift won't end
If everything seems done but there's no "The doctor is coming" message, one of the remaining "patients" is an anomaly. Find it.
More Animal Hospital guides for beginners
Values verified against community data. Last checked: August 31, 2026.